
Shooting Page
Last Updated: 02/02/2015
On This Page
Shooting Page
Last Updated: 02/02/2015
On This Page
![]()
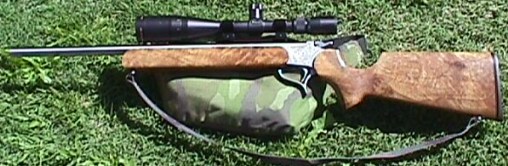
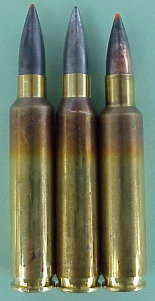
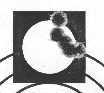
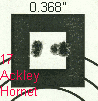
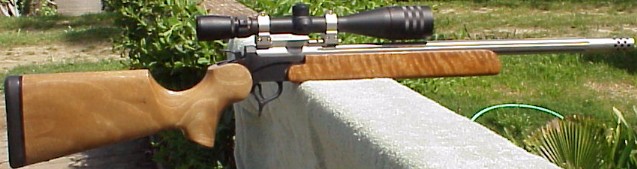
SQUIRREL RIFLE.... This is my Thompson/Center Contender Carbine with a 22 inch stainless steel Bullberry barrel chambered for a 17 Ackley Hornet (9.25 lb). The butt stock and forearm are Bullberry's "Utility Wood" with their inexpensive epoxy finish adds a touch of class. The scope on it now is a Nikon 6.5-20x by 44 Matt Finish, Fine Crosshair. I also have Bullberry barrels for 17 Mach IV Match, 22 K-Hornet, 221 Rem Fireball Match, 6mm Bullberry Match, and 22LR Match.
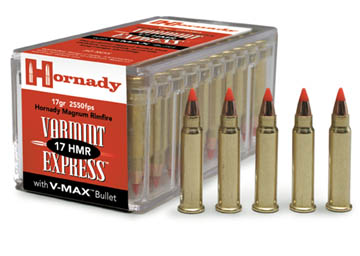
NEW BARREL FOR MY SQUIRREL RIFLE.... I have ordered a new barrel from Bullberry for my Contender Carbine. It will be chambered for the new 17 Hornady Magnum Rimfire. The order is for a 22 inch Full-Bull, stainless steel with a bead blasted finish. It will look exactly the same as the 17 Ackley Hornet barrel shown in the picture. I am really excited about this new caliber. Hornady 800-338-3220 claims that ammo will be shipping in January or February of 2002. The new caliber will make a very nice varmint round with a mild report and should be effective out to 150 yards or so. Here is a picture of a box of ammo.
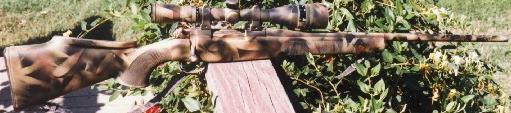
DEER RIFLE.... This is my deer/coyote rifle. It is a 243 Win on an old Sako Forester action with a Shilen stainless steel barrel and a "tight neck" Match chamber. The scope is a Tasco 4x-16x TR mounted on Warne rings that attach to the tapered grooves of the action. The scope is calibrated out to 500 yards for the 95 gr. Nosler Ballistic Tips at a muzzle velocity of 2900 fps. The stock is French walnut with beautiful fiddle back grain down under there somewhere. The camo paint job is explained on my Hunting Page.
MORE POWER.... For the big wild boars, my Weatherby Vanguard in 7mm Rem Magnum (not shown) is more effective. The stories about wild boar hunting on my Hunting Stories Page explain why I prefer the 7mm Rem Magnum.
![]()
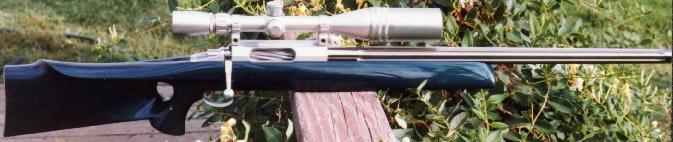
![]() MY DREAM RIFLE.... This is
my Stolle Panda in 23/40 built by Kelbly.
It is a very fine, no compromise, rifle with its fluted bolt, fluted stainless
steel barrel plus the beautifully finished benchrest thumbhole stock. The
machine work, fit and finish are perfect. It is built like a fine Swiss watch
and is as smooth as silk. It just "feels good" to open and close the
bolt. The trigger is a Jewell Trigger at about 4 ounces. I increased the
resolution on the picture so you can better appreciate these fine qualities and
dream. Many people have asked about this rifle. Here is the Word document where
I ordered the rifle. Kelbly.doc Note: NO camo paint
here!
MY DREAM RIFLE.... This is
my Stolle Panda in 23/40 built by Kelbly.
It is a very fine, no compromise, rifle with its fluted bolt, fluted stainless
steel barrel plus the beautifully finished benchrest thumbhole stock. The
machine work, fit and finish are perfect. It is built like a fine Swiss watch
and is as smooth as silk. It just "feels good" to open and close the
bolt. The trigger is a Jewell Trigger at about 4 ounces. I increased the
resolution on the picture so you can better appreciate these fine qualities and
dream. Many people have asked about this rifle. Here is the Word document where
I ordered the rifle. Kelbly.doc Note: NO camo paint
here!
DIFFERENCE BETWEEN 23/40 AND 223 ACKLEY IMPROVED.... My Stolle Panda is a 23/40 and it is slightly different than a 223 Ackley improved. Both have a 40° shoulder, but the shoulder location is different. I dont recommend getting a 23/40 because it is much more difficult to make the brass compared to the 223 AI.
Left to right is a 223 Ackley Improved, 223 Rem, and the 23/40. The 23/40 holds a bit less powder than the 223 AI because it preserves the 223 location of the intersection of the case body and the shoulder. This leaves a longer neck. You can't chamber factory brass in the 22/40 chamber. The cases are more difficult to make because the forming dies have to be used before you can chamber the round the first time. The 223 Ackley Improved has a 40° shoulder with the intersection of the shoulder and neck preserved from the original 223 location. With the 223 Ackley Improved, you can chamber factory rounds and fire-form without using forming dies. I have made 300 "fitted-neck" cases for my 23/40 and it was a lot more work than it would have been with a 223 Ackley Improved, but they work great and will last indefinitely. On loading data for the 23/40, the standard 223 data times 1.1 is pretty good. I use a load of 25.3 gr. of H322 and the Nosler 40 gr. Ballistic Tip bullet. It gives about 3500 fps and is spectacular on ground squirrels out to 300 yards. This is a mild, but accurate load. The Stolle Panda and the heavy fluted barrel is a bit heavy to carry around in the field.
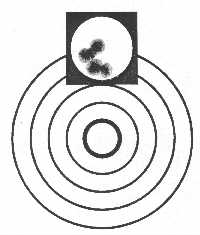
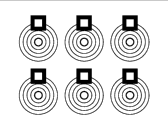
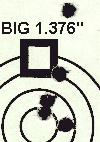
NEW SCOPE.... I had just mounted one of the new Sightron 4-16x42 Stainless Steel scopes on the rifle and the scope seems to also work very well after one day of testing. The Sightron scope has a 1/2 minute dot reticle with very fine crosshairs and 1/8 minute click adjustments. I generated the above target with AutoSketch that works better with the dot reticule than the standard benchrest targets. It is easier for me to center the dot in the white circle than in a white square. The actual size of the square is 1 inch on a side.
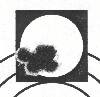
GROUP IN LOW 3'S.... Here is a 100 yard 5 shot group using bullets sprayed with the "Ms Moly" Molybdenum Disulfide coating. The load for the 23/40 (a straight cased 223 with a 40° shoulder) was the 40 gr. Nosler Ballistic Tip bullets and my standard load of 25.3 gr. of H322 giving a velocity of approximately 3500 fps. The group, in the low 3's, is not exceptional, but not bad either. It was fired after about 40 rounds through the barrel, all with Moly-coated bullets and no cleaning. This accuracy level is good enough for most ground squirrel shooting. I later fired another 30 Moly-coated rounds through the barrel at ground squirrels. When I cleaned it, there was no evidence of copper in the barrel after 70 rounds. So far, it looks like the "Ms Moly" works very well.
ONE OR TWO PIECE SCOPE BASE.... The
question of one piece or two piece scope base is a tricky question. There are a
number of other factors that need to be considered to optimize the situation.
Let's assume that that both bases fit the action reasonably well. First, the
action is usually 4140 steel or equivalent with a Coefficient of Thermal
Expansion (CTE) of 6.2E-6 in/(in-°F). One exception I know of is the Stolle
Panda action which is aluminum. Aluminum 6061-T6 has a CTE of 13.1E-6 or more
than twice that of steel. The difference in thermal expansion is the major
problem with a one piece aluminum base on a steel action. When the base is
screwed onto the action at say 72 °F and assuming it fits well, it is stress
free in the axial direction. If the assembly is then heated to 120 °F (which is
possible in full sun), the differential in expansion between the base and action
for a 5 inch span is:
dL=L * da * dT,
where dL is the length difference (in), L is the span length (5 in), da is the
difference in CTE's between steel and aluminum (6.9E-6 in/(in-°F)), and dT is
(48 °F) the temperature change.
Running the numbers, the 5 inch section of a free base would lengthen about
0.00166 inch more than the action would. The cross-section area of the B-Square
base on my Savage 12BVSS is approximately 0.12 sq-in and force required to
compress the 5 inch section of the base 0.00166 inch is,
Force = K * dL = 398 lb
Where the spring constant, K = Area * Elastic-Modulus / Length
Area = .12 sq-inch
Elastic-Modulus = 10E6 lb/sq-inch
L = 5 inch
K = 240,000 lb/inch and the force required to shorten the base 0.00166 inch is
398 lb. This is a lot of force! The stress in the aluminum base is 3,300 psi
which is well below the yield stress.
ASSUMING THE ACTION IS RIGID.... This assumes that the much
larger steel action is rigid and is a reasonable assumption because the action
is much larger than the base. Taking into account the flexibility of the action
involves a statically indeterminate problem. This would require very
sophisticated Finite Element Analysis including the geometry of each action and
one piece base to determine the deformations of both. Now assume that your rifle
scope is made of aluminum. If you use a two piece base, then a 0.00166 inch
displacement goes directly into the scope tube. If the section area of the scope
tube is half that of the base, then the force would be half or 199 lb. But in
either event you are going to shorten the center of the scope. Using an aluminum
one piece base, resists some of the load and lowers the load transmitted to the
scope. I think you would change the point of impact more by stressing the scope
than stressing the action, all else being equal.
But, if you have a scope with a steel tube, and use a two piece base, then the
mounted scope goes through temperature swings, matching the action's length
change, without being stressed. This is the best of all worlds. It is also
similar with an aluminum Stolle Panda action and an aluminum scope.
SUMMARY.... So, in summary, I would suggest:
Steel action, aluminum scope: use a one piece aluminum scope base.
Steel action, steel scope: use a two piece steel or aluminum scope bases.
DO THE BASES SLIP UNDER THIS LOAD?.... The screws and static
friction between the base and action transfer the shear load from the base to
the action. If you assume two ea. #6-48 screws on each end of the base, and
torque them to about 24 in-lb, then the clamping preload the two screws is about
1750 lb on each end. Using a coefficient of static friction of 0.3, reasonable
for the dry surfaces here, it would require a force greater than 500 pounds
before the junction between the base and action could slide in relation to each
other. This is also one of the reasons to tighten the screws well on your scope
base. If there is only one screw in one end of the base, then there could be
some sliding and that could lower the load to a maximum of 250 lb or so. I don't
think the screws affect the conclusions I made above.
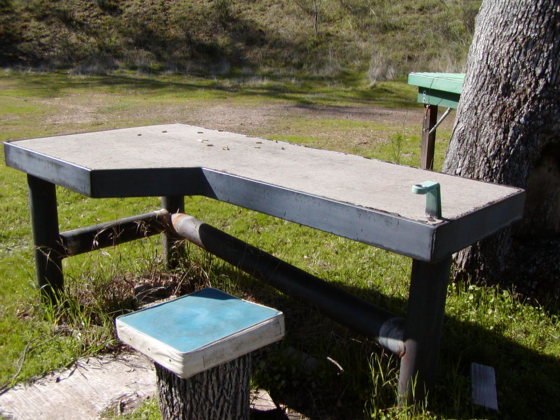
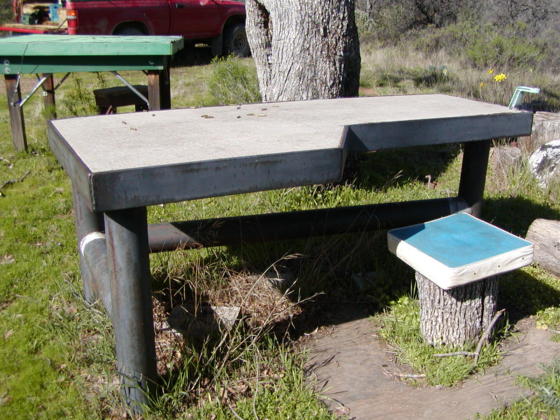
A STURDY AND SOLID BENCHREST.... A long time ago, I asked Danny to build me
a solid benchrest. He did. It is built out of 6" Diameter pipe and 4"
angle iron and filled with reinforced concrete. The pipe legs are in concrete
about 3 ft deep. I also reload at the bench when I am load testing. So I had a
spare powder measure holder and it is "cast in concrete" so to speak.
As you can tell, I am right handed and I didn't bother with an ambidextrous
benchrest. The seat is a log cut to length with a life preserver for a cushion.
It works. I can't blame any bad groups on a shaky benchrest. Here are some benchrest
plans.
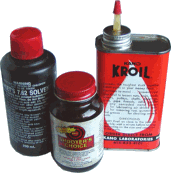
HOW TO APPLY Ms MOLY.... The Spray on Ms Moly is probably not as good as the Moly-coating applied by the complicated Neco technique. But, it works very well in spite of the ease of application. I have used it on about 1000 bullets so far and it has essentially stopped copper fouling. I found that it sticks best to jacked bullets if I preheat them with a hair drier first. So you won't blow the bullets over, when you first direct it toward the bullets, put your hand over the intake of the hair drier to reduce the flow. Once you are directly over them and blowing downward, you can remove your hand and allow the full flow and the bullets will still stand up. After about 1.5 min of heating I immediately spray them from 4 sides. Then another 2 min with the hair drier to dry them up. I let them set for about 20 min and finally put them back in the boxes. The coating is still soft for about a day. It is best if you wait a day or so before you load them.
HOW TO GET Ms MOLY.... A number of people have asked me where you get Ms Moly. The phone number is 800-264-4140 and for about $30 you get two 16 oz spray cans and two foam templates to help you stand up the bullets for spraying.
 Here I am shooting a
group.
Here I am shooting a
group.
TESTING MOLY-COATED BULLETS.... On 10/27/97 I tested some Moly-coated bullets at the cabin with the Stolle Panda. All shots were fired at 100 yards off the bench like the photo above. Here are the nine 5-shot groups. The black square is one inch on a side. All groups were fired with Military TW-75 brass that had been previously fire-formed. The reloading process, at the benchrest, requires removing the primer, cleaning the primer pocket, cleaning the neck ID, seating a new primer, charging with powder, and seating the bullet by hand with a Wilson bullet seater. No neck sizing was required with the "fitted neck" brass. The barrel was clean at the start and there were no fouling rounds or sighter rounds fired. The barrel was not cleaned during the test. Federal 205M primers and H-322 powder was used. There was a variable wind velocity of approximately 3 to 5 mph from variable directions. Winds in the mountains are tricky. The targets below are A1 through A6.


B1 through B3
|
Target & Group Size (in.) |
H-322 Powder (gr.) |
Nosler Bullet |
Moly-coating |
Primer Pressure |
|
A1 .356 |
25.88 |
40 gr. BT |
Ms Moly |
Mild |
|
A2 .456 |
25.88 |
52 gr. Match |
Ms Moly |
Too Hot |
|
A3 .286 |
25.51 |
52 gr. Match |
Ms Moly |
OK |
|
3 Clicks of right |
Windage 1/8-inch ea. |
|||
|
A4 .356 |
25.88 |
40 gr. BT |
Ms Moly |
Mild |
|
A5 .236 |
26.25 |
40 gr. BT |
Neco |
Mild |
|
A6 .496 |
26.63 |
40 gr. BT |
Neco |
OK |
|
3 Clicks of left |
Windage |
|||
|
B1 .556 |
26.25 |
40 gr. BT |
Neco |
Mild |
|
B2 .376 |
26.25 |
40 gr. BT |
Neco |
Mild |
|
B3 .356 |
26.25 |
40 gr. BT |
Neco |
Mild |
COMMENTS.... There is little difference between the accuracy of the Ms Moly spray or Neco coated bullets (coated by Dick Hatfield, see below) that I can detect. I thought that the Match bullets would do better than the BT's, but maybe I can't hold any better than this. I made the pictures as small as possible and accidentally clipped part of one bullet hole off the A2 target, sorry. The B1 "heart break" group started out with the first shot to the right, then the rest went into the hole to the left and four bullets are in a 0.136 inch group. It could be that the scope was not settled in after 3 clicks of left windage. There are really 5 shots in the B2 group. After 45 rounds through the barrel with no cleaning, there is no apparent degradation in accuracy that I can detect. I am sure the groups would have tended to open up with bare copper bullets after 45 rounds without cleaning.
The Free Target Downloads have been moved to a separate page.
Click here: Free Target Downloads
![]() ULTRA
LIGHT 224 BULLETS.... I purchased some 33 gr. Hornady V-Max bullets from
Lock, Stock, & Barrel. They are only sold in bulk boxes of 1000. It sounded
intriguing to try some of these light bullets in my 22 K-Hornet. The first thing
I did was to spray them with Ms Moly. To see if the bullets were consistent, I
fired a few groups with them in the Stolle Panda. I also wanted to get an idea
of what velocity they would tolerate. I got a fairly reasonable 5 shot group
which measured 0.426 inch at a velocity of 3625 fps using H322 powder. Then I
dropped the velocity down to 3500 fps and shot this group that measures 0.376
inch center to center.
ULTRA
LIGHT 224 BULLETS.... I purchased some 33 gr. Hornady V-Max bullets from
Lock, Stock, & Barrel. They are only sold in bulk boxes of 1000. It sounded
intriguing to try some of these light bullets in my 22 K-Hornet. The first thing
I did was to spray them with Ms Moly. To see if the bullets were consistent, I
fired a few groups with them in the Stolle Panda. I also wanted to get an idea
of what velocity they would tolerate. I got a fairly reasonable 5 shot group
which measured 0.426 inch at a velocity of 3625 fps using H322 powder. Then I
dropped the velocity down to 3500 fps and shot this group that measures 0.376
inch center to center.
The bullets seem to be well made and reasonably consistent. A 33 gr. bullet at 3500 fps ought to do a respectable job on ground squirrels. They are also still quite accurate at a velocity of at least 3625 fps. I will have to wait until I get my 22-250 Improved Encore barrel to test them at higher velocities.
22 K-HORNET... Next, I wanted to see how well they would shoot in my Contender carbine with the 22 K-Hornet Bullberry barrel, full bull contour, 22 inch long. I started with 11.3 gr. of H110 at about 3000 fps and shot a 1-1/4-inch group. I increased the powder up to a velocity of 3350 fps and the group moved up and left slightly, but still in the 1-1/4-inch range. Also, the load didn't feel like a 22 K-Hornet should and it was too loud. It did not show high pressure signs, but had a much louder report than I want for the Hornet. I dropped down to a load that gave 3050 fps and the group shrunk. This looks like a good load to try for a while with these bullets in the 22 K-Hornet. The group below was shot with this load and measures 1.08 inch, but 4 of the holes measure 0.356 inch. I think this is about as good as I can do for now. I couldn't do anymore testing today, because the rains were starting and I wanted to get out from the cabin while the roads would still be passable.
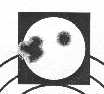
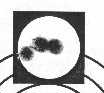
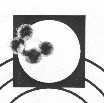
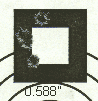
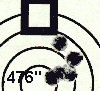
T/C CONTENDER 17 ACKLEY HORNET.... Here are three groups shot with the 17 Ackley Hornet with the 20 gr. Berger MEF Moly bullets using the new Nikon scope. They are not benchrest quality, but will stay on a ground squirrel out to 200 yards if the wind is mild. The outside of the square aimpoint is 1 inch on a side.
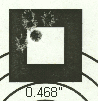
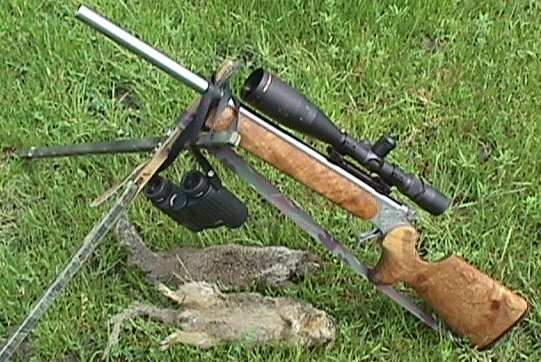
Here is a picture of the Contender Carbine in 17 Ackley Hornet, my binoculars, my Bi-Fur-Pod and a couple of nice ground squirrels. Advance time. A year and a half later with the same 17 Ackley Hornet rifle and the new Hornady 20 gr. V-Max bullets, Moly-coated at 3773 fps and AA-1680 powder out of a dirty cold barrel and no wind. Here is the group.

NEW BARREL BREAK IN.... There is so much black magic out there about breaking in a barrel, that I am not going to suggest any procedure. I will merely tell you what I do with a new barrel. I take the brand new barrel and use J-B on it. That's right, I clean and polish it with J-B before even firing the first round through it. I put a light coat of J-B on a patch and give the barrel about 50 strokes from end to end with it. Then I clean the J-B out with a couple of patches of Shooter's Choice MC#7. I dry the bore with 3 or 4 patches until it is completely dry. I carefully clean the chamber of J-B too. That's it, the barrel is broken in and I am ready to sight in, shoot some groups, and work up an accurate load. I take the rifle to the range and shoot 3 or 4 five shot groups with Moly-coated bullets. I clean the barrel with Sweet's 7.62 and usually there is no copper. From then on, shooting only Moly-coated bullets, I clean the barrel when I feel guilty. If there is copper on the first cleaning, I conclude that I didn't do enough with the J-B and repeat the J-B treatment. All that these shoot-clean, shoot-clean, etc. break in processes do, in my opinion, is perform a slow, inefficient, and expensive polishing process which the J-B does better, smoother, and faster. I use a plastic coated stainless steel cleaning rod and a jag style that you wrap the patches around. I use the blue Shop Towels for patch material and I cut a roll into a number of 1-½-inch wide rolls with a sharp knife. I never use brushes in my barrels and I don't even have any. I use J-B, Shooter's Choice MC#7, and Sweet's 7.62. I am sure there are other procedures that are just as good or superior, but this works very well for me. If I have a particularly bad copper fouling barrel, I use Flitz Metal Polish instead of JB. Here and you can see what Shilen recommends for breaking in a new barrel.
NOTE. A J-B patch will turn black even after the barrel is clean so you shouldnt try to clean a barrel with J-B until the patch remains "clean".
![]() WHAT IS J-B?... J-B Non
Embedding Bore Cleaning Compound. My two ounce jar of J-B has lasted me for 15+
years and is still going strong. It is a bore cleaning compound that polishes
the bore. Here is more info I have just received and verified on J-B. Page 229
of Brownells' catalog #50 has a complete write up on the "J-B bore cleaning
compound". It claims this to be the original formula developed by Jim
Brobst (Jim Brobst is the name on my old jar of J-B) and produced under an
exclusive license. From them, a two ounce jar sells for $5.95. Brownells'
phone number is (515) 623-5401.
WHAT IS J-B?... J-B Non
Embedding Bore Cleaning Compound. My two ounce jar of J-B has lasted me for 15+
years and is still going strong. It is a bore cleaning compound that polishes
the bore. Here is more info I have just received and verified on J-B. Page 229
of Brownells' catalog #50 has a complete write up on the "J-B bore cleaning
compound". It claims this to be the original formula developed by Jim
Brobst (Jim Brobst is the name on my old jar of J-B) and produced under an
exclusive license. From them, a two ounce jar sells for $5.95. Brownells'
phone number is (515) 623-5401.
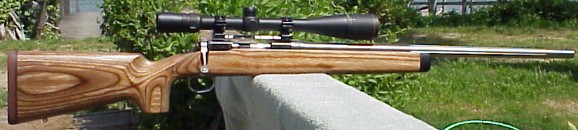
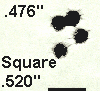
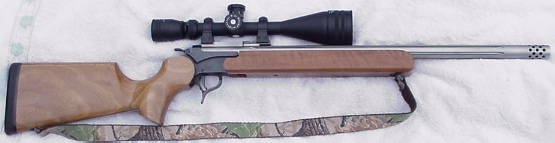
SAVAGE 12BVSS RIFLE.... I purchased a new Savage 12BVSS rifle in 22-250 caliber. There has been so much discussion on how the Savage rifles are accurate right out of the box I couldn't resist. I put a B&L 4000 Elite scope on it with a B-Square base and Kwik-Site rings. Here is a picture of it.
I neck turned 120 Win brass for it and did all the other case prep I describe on my Reloading Page. I loaded them with 36 gr. Varget and 40 gr. Nosler Ballistic Tip Moly-coated bullets. I used my barrel "break in" with JB and fired these groups from the benchrest up at my cabin.
 .
.  .
.  .
.  .
. 
These five consecutive groups were fired while I was fire forming the brass. The square outside dimension is 0.520 inch on a side. The groups opened up after 20 rounds. There was quite a bit of copper fouling in the barrel when I cleaned it after 25 rounds. I can't take time to clean the barrel after 20 rounds out in the field, so I have polished the barrel out with (now don't get shocked!) Flitz Metal Polish. The machine marks were quite visible in the barrel bore finish. I have not had a chance to get back up to the benchrest since I have polished the barrel, but I did go five straight on ground squirrels and two more today without a miss. I have to agree that this is one fine rifle for the price. I will post the info after more testing. NOTE: Well, it is later and I have to admit that the Savage is just gathering dust. I am having so much fun with the Encore 223 Ackley Improved that I haven't had the Savage out in the field since the first tests were done. Some day, I might get back to the Savage. What do they say about riding a good horse into the ground?
REPLACED THE TRIGGER.... I installed the Sharp Shooter Competition Trigger. Check them out for more detailed information. It achieves the lighter pull force from a clever design with additional mechanical advantage over the original sear. It easily adjusts to 1 pound. It also gets the 1 pound setting with full sear engagement on the new sear. I could adjust it lower, but 1 pound is just about right for me when varmint hunting. It was relatively easy to install. One bit of warning is that when you remove the sear pin Savage part #47, be careful not to lose the bushing Savage part #48. It is one of those assemblies that sort of explodes when the pin comes out. Also the file tabs "Fig. 2 File to align pin holes" (on the Sharp Shooter instructions) sits on top of the trigger bracket (not in front or behind the trigger bracket) and did not need filing on my trigger. One other thing is that you will probably need to file down the tip of the Bolt Release Tab on the sear assembly Savage part #46. I did it by installing the trigger and pulling the sear assembly all the way trying to release the bolt and then reaching in with a scribe and marking the flush position on the side of the tab. Then when I removed the sear it was easy to file to the mark. I sure recommend this trigger for the Savage. The original trigger was so hard, I needed a chain hoist to pull it and that is too much gear to pack on a varmint hunt.
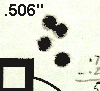
CLEAN BARREL ACCURACY.... Here is my Encore in 223 Ackley Improved. I have a total of about 600 rounds through it and one question I see asked a lot is how often do I need to clean my barrel when using Moly-coated bullets and still preserve good accuracy. The first 50 rounds were shot at ground squirrels on the way up to my mountain cabin. Without cleaning the barrel, here is a target I shot off the bench with rounds number 52-56 through the barrel. The load is 26.5 gr. H322 and 40 gr. Nosler Ballistic Tips moly (Midway method) at about 3700 fps. I fired one round at a sighter target and then shot the group. The five shot group measures 0.356 inch and the side of the target square is 0.550 inch. No wonder I was doing so well on the ground squirrels. Maybe I should have gone 100 rounds or more before cleaning the barrel.
WHAT IS THE DIFFERENCE.... I frequently get questions about the difference between the Contender and Encore. Below is a summary of the differences. If you find an error or have anything else to add, please email me here.
Differences Between the Thompson/Center Contender and Encore
Thompson/Center Contender
(old style & "easy open" style)
|
Thompson/Center Encore
|
The weight of the new Contender G2 frame is unknown. The new Contender G2 is reported to accept old Contender barrels and have a trigger similar to the Encore trigger.
* The 45-70 is a factory chambering in the Contender. The Contender can be chambered for low/medium pressure large calibers and small high pressure calibers based on the .223 Rem size case.
With the "easy open" action, in some cases, just pulling back on the trigger guard will reset the hammer for cocking.
![]() Note. The Contender
and Encore barrels are not interchangeable.
Note. The Contender
and Encore barrels are not interchangeable.
MY FAVORITE RIFLE.... I have been shooting the Encore 223 Ackley Improved for about a year and a half. It has become my favorite rifle. It is very consistent and is producing excellent accuracy. I changed scopes from the Weaver shown below to the Tasco 8-32X by 50mm World Class Plus and the combination works great. I made 250 "fitted neck" brass for it and about 5 spares. I have lost one piece of brass when I hit the neck with the de-capping pin. One hundred out of Federal Gold Medal match brass and 155 out of TW-74 Military new unfired brass. I have over a thousand rounds through the rifle and some of the brass has been loaded 4 or 5 times and is just like new. I confess. I don't even have dies for the rifle. I have no FL, or Neck die. I don't even have a seating die for it. I use the Wilson hand seating die for my 23/40 with a spacer to seat the bullets. When I reload, I clean the neck ID with a cotton swab, punch out the primer, and uniform the primer pocket. I seat the primer, charge with powder and seat the bullet. No dies are involved. I polished my chamber and there is no case stretching and the brass chambers easily. My load of H322 gives me 3840 fps with the 40 gr Nosler Ballistic Tips with very good accuracy. It was an extra effort to make the "fitted neck" brass at first, but reloading is very easy and case life is unlimited.

 one year later: 6/25/1 here is another group
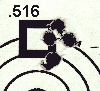
KISSED THE CROWN.... As the bullet exits the barrel, the
bullet's base should leave each one of the lands at the exact same time. If the
barrel crown in not uniform or has been worn or dented, the base of the bullet
will be displaced to the side when it exits. With a damaged or non-uniform
crown, good accuracy is not possible. I worked on the Encore 223 Ackley Improved
barrel above to true up the crown that was already in pretty good shape. I took
a 1/2-inch diameter spherical Dremel stone and mounted it into a small hand held
chuck. I very carefully re-ground the crown of the barrel, by hand, until it
cleaned up each of the lands and about a 0.010 inch wide ring around the bore at
the end of the barrel. I did NOT use a power tool to turn the stone. I rotated
it by hand and it took about ten minutes of light back & forth turning to
true up the crown. I put on two sets of +2.5 close-up glasses to view the
progress. A person can really ruin a good barrel crown job if he is not careful.
It didn't hurt the accuracy and above is a group I shot after the process. The
group measured 0.516 inch, but four shots were in 0.116 inch. Not bad for 40 gr.
Nosler Ballistic Tips at about 3700 fps.
Small chuck and 1/2" diameter ball stone, turned by hand.
Note: It is easier to view the crown clean up process if you first
blacken the crown area with a black Sharpie pen.
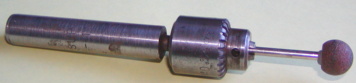
The ball stone I use came with my Weller Model 601 hand held grinder. Of course that tool is no longer available. The shank is 1/8" and the ball diameter is 1/2". The grit is coarse, but I dulled the stone by turning it at drill motor speed (approximately 600 rpm) in my Mini-Lathe. I used a diamond hone to dress the stone's surface. I slowly rotated the hone over the surface following the curvature of the ball. The effect was to dull the cutting action of the stone and make the stone behave as if it were a very fine grit. Here are the results of a Google Search for 1/8 Shank Grinding stones: Here1 Here2.
CLICKS MADE EASY.... I have a Nikon 800 laser range finder and it has added a whole new dimension to long range shooting. I can now shoot very accurately on the first shot at different long ranges, but it takes some homework. I use the Load from Disk software to calculate bullet drop information. Once you have the bullet drop information, it is helpful to know how many clicks it takes to adjust your scope's crosshairs to to the impact point at various distances. A 1/4-inch click at 100 yards is 3/4-inch at 300 yards and so on. It is difficult to do the calculations when you are in the field and a ground squirrel stands up at 450 yards. Well, I wrote a small BASIC program, the compiled executable is CLICK.EXE, that prints a table of click adjustments for my rifle/bullet/scope. I have the output file printed and taped on my stock for quick reference. If you want to edit the program, the BASIC source is CLICK.BAS. This program was originally for a Tasco World Class Plus 8-32X by 50mm scope that is zeroed at 100 yards. I have changed it to work for other scopes like Leupold and Nikon etc.
![]() Note:
These guys have made it much easier to calculate clicks than run my Clicks
program: Ballistics
Calculator the easy way. Something about building a better mouse trap.
Note:
These guys have made it much easier to calculate clicks than run my Clicks
program: Ballistics
Calculator the easy way. Something about building a better mouse trap.
 Current configuration with the Tasco scope.
HOW LARGE ARE THE CLICKS AT 100 YARDS.... First the program needs to know the point of impact movement for each click at 100 yards which happens to be 0.1394 inches for my Tasco World Class Plus. Using the manufacturer's numbers here is not accurate enough when you shoot at long ranges. To get the correct value, you will need to shoot a group at 100 yards and then raise the scope say 20 clicks and shoot another group. Measure the distance between the centers of the two groups and divide by 20 and you will have the size of a click at 100 yards. I did a careful experiment at the benchrest to determine the click size. Hence the 0.1394 in the first line of the input file.
ELEVATION DIVISIONS.... All scopes are not
numbered the same. I have tried to make the program so it will accept most any
scope's elevation knob's numbering convention, but ones that show zero &
plus/minus divisions are not included. The program needs to know the number of
divisions identified by number, the number of division between the numbered
divisions, and the number of division between the last numbered division and the
Zero division (usually zero on most scopes). The Tasco World Class Plus
8-32x50mm with large target knobs is not a delicate scope, but the optics are
much clearer and brighter than my old Leupold 6.5-20x40mm VariX III that costs
twice as much many years ago. The first line of the input file is for the Tasco
has 0.1394 inch clicks (they claim 1/8-inch clicks, close but
no cigar) at 100 yards and there are 7 numbered divisions with 8
small click divisions between the numbered divisions, but only 4
click divisions between 7-0. The following lines are Distance (yards), Drop
(in). The data are separated by commas.

Here are the elevation turret markings on the example scope. In one turn, the
Numbered Large Divisions start at 0 and extend up to 7 and then back to 0. There
are 7 Numbered Large Divisions with 8 Divisions between each Numbered Large
Division. There are 4 Divisions after the last Large Numbered Division, before
it repeats at 0, as you go around the turret knob. Therefore the first line of
the Sample input file has.
Numbered Large divisions........................ 7
Divisions between Numbered  Large divisions..... 8
Divisions after last Numbered Large division.... 4
DROP TABLE INFORMATION.... The program then needs the distance in yards and the corresponding inches of drop for each distance out to as far as you want. In the example, I calculated the drop for my 223 Ackley Improve shooting the 40 gr. Nosler Ballistic Tips at a 3840 fps muzzle velocity. The table extends out to 900 yards by 25 yard increments.. You don't need the minus sign on the drop values, but the program will also work if you are a physicist and want to work with negative numbers.
Note: I have compared the output of the free PointBlank v1.8a, 221 KB Reloading and Ballistic Software (PC & Windows) with the results from Load from Disk and the results are within one inch at 900 yards for the 40 gr Nosler BT bullet I used. You can calculate the external ballistics with PointBlank and best of all, it is free.
SAMPLE INPUT FILE.... Here is the text of my CLICKIN.TXT file for the Tasco scope and 40 gr. .224 Nosler Ballistic Tip bullets with a velocity of 3840 fps:
0.1394, 7, 8, 4
100,  0.00
125,  0.01
150, -0.18
175, -0.59
200, -1.26
225, -2.17
250, -3.37
275, -4.87
300, -6.70
325, -8.88
350,-11.44
375,-14.42
400,-17.85
425,-21.77
450,-26.24
475,-31.28
500,-36.95
525,-43.32
550,-50.47
575,-58.44
600,-67.32
625,-77.17
650,-88.07
675,100.20
700,113.63
725,128.38
750,144.43
775,162.74
800,182.38
825,203.68
850,226.74
875,251.62
900,278.58
HOW TO DOWNLOAD & RUN.... Download CLICK.EXE and save it to the same folder where you have your input file. To download, click on CLICKIN.TXT and then click on File and Save As with it default name to the same folder you put CLICK.EXE in. Open the folder and double click on CLICK.EXE and it will run and the output will be the table that you can print and take to the field. If you are really brave and your rifle buttstock has a good finish, you can tape the table to your buttstock like I have done. You will get comments that it looks crude having a piece of paper taped to your stock, but the laughs will quiet as soon as they see how you can shoot at different ranges and be very close on the FIRST shot. Use Notepad to make your own CLICKIN.TXT file for your rifle and scope and run CLICK.EXE again and generate an output tailored to your for your rifle.
Here is the CLICKOUT.TXT file after running the program:
Yrd = Distance in yards
CL  = Total Number of Clicks
T   = Total Full Turns
L   = Large Division Number
S   = Additional Small Divisions

Yrd  CL T  L.S
100   0 0. 0.0
125   0 0. 0.0
150   1 0. 0.1
175   2 0. 0.2
200   5 0. 0.5
225   7 0. 0.7
250  10 0. 1.2
275  13 0. 1.5
300  16 0. 2.0
325  20 0. 2.4
350  23 0. 2.7
375  28 0. 3.4
400  32 0. 4.0
425  37 0. 4.5
450  42 0. 5.2
475  47 0. 5.7
500  53 0. 6.5
525  59 0. 7.3
550  66 1. 0.6
575  73 1. 1.5
600  80 1. 2.4
625  89 1. 3.5
650  97 1. 4.5
675 106 1. 5.6
700 116 1. 7.0
725 127 2. 0.7
750 138 2. 2.2
775 151 2. 3.7
800 164 2. 5.4
825 177 2. 7.1
850 191 3. 1.3
875 206 3. 3.2
900 222 3. 5.2
FIELD USE.... Here is an example of how to use the CLICKOUT.TXT output file. For example, suppose you use your Rangefinder and spot a target at 625 yards. The total number of clicks would be 89. Sitting there and counting out 89 clicks would be a pain. From the Table, you would rotate the knob one full turn, then to the Number 3 Division plus 5 small division and Voila! You should hit right on with the first shot if there is no wind and all of your bullet velocity, BC's and scope height input was correct and the drop calculations are correct. I have tested this with my rifle and I hit within just a few inches with no wind and at distances out to 550 yards.
CLICK CHARTS FOR 3 RIFLES.... Here are the click charts that I have on three of my rifles. The header gives the cartridge, bullet, velocity, scope, and click size:
| .223 Ackley
Improved 40 gr Nosler Ballistic Tip 3840 fps Velocity Tasco WCP 8-32x50mm Click=0.1394 inch |
.17
Mach IV 20 gr Hornady V-Max 3678 fps Velocity Weaver 6-24x42mm Click=0.1202 inch |
.17 Ackley
Hornet 20 gr Hornady V-Max 3773 fps Velocity Nikon 6.5-20x44mm Click=0.1427 inch |
| Yrd CL T. L.S 100 0 0. 0.0 125 0 0. 0.0 150 1 0. 0.1 175 2 0. 0.2 200 5 0. 0.5 225 7 0. 0.7 250 10 0. 1.2 275 13 0. 1.5 300 17 0. 2.0 325 20 0. 2.4 350 24 0. 2.7 375 28 0. 3.4 400 33 0. 4.0 425 37 0. 4.5 450 42 0. 5.2 475 48 0. 5.7 500 54 0. 6.5 525 60 0. 7.3 550 66 1. 0.6 575 73 1. 1.5 600 81 1. 2.4 625 89 1. 3.5 650 98 1. 4.5 675 107 1. 5.6 700 117 1. 7.0 725 128 2. 0.7 750 139 2. 2.2 775 151 2. 3.7 800 164 2. 5.4 825 178 2. 7.1 850 192 3. 1.3 875 207 3. 3.2 900 223 3. 5.2 |
Yrd
CL T. L.S 100 0 0. 0.0 125 1 0. 0.1 150 3 0. 0.3 175 6 0. 0.5 200 9 0. 1.1 225 13 0. 1.4 250 17 0. 2.0 275 22 0. 2.5 300 27 0. 3.2 325 32 0. 4.0 350 38 0. 4.6 375 45 0. 5.4 400 52 1. 0.3 425 59 1. 1.3 450 68 1. 2.3 475 77 1. 3.4 500 87 1. 4.6 525 97 2. 0.1 550 109 2. 1.5 575 122 2. 3.1 600 135 2. 4.7
|
Yrd
CL T. L.S 100 0 0. 0.0 125 1 0. 0.1 150 2 0. 0.2 175 4 0. 0.4 200 7 0. 0.6 225 10 0. 1.1 250 13 0. 1.5 275 17 0. 2.0 300 21 0. 2.4 325 25 0. 3.1 350 30 0. 3.5 375 35 0. 4.3 400 41 0. 5.0 425 47 0. 5.6 450 53 1. 0.5 475 60 1. 1.4 500 68 1. 2.4 525 77 1. 3.4 550 86 1. 4.5 575 96 1. 5.7 600 107 2. 1.2
|

The Tasco World Class Plus 8-32X by 50mm scope is not delicate. The stainless
steel Weaver style base is made by Virgin Valley and the large objective
requires the High Warne rings. These target knobs are for serious elevation and
windage adjustments with clicks you can feel.
TARGET KNOBS HARD TO TURN.... I have heard that some of the new Tasco's target knobs are hard to turn on new scopes right out of the box. Tasco puts lots of grease inside the knobs and when the grease is cold it makes the knobs difficult to turn and the clicks less distinct. I removed the target knobs and wiped most of the grease from the O-Ring and the ID of the knobs. This helped quite a bit. Plus I set the new scope in the window with the sun shinning on it for about 30 minutes until it was warm before trying to turn the knobs. One person attempted to turn the knob counter clockwise on a new cold scope and unscrewed the complete turret from the body. If the knob turns hard, turn it clockwise at first or better yet, remove the screw and clean out the grease first.
POSTED.... Here is some info I posted on the Go Go Varmint Go message board about the Tasco WCP 8-32x50mm scope:
You guys aren't going to believe this, but there are other rifle scopes besides Leupold! I put a Tasco World Class Plus 8-32x50 on my favorite varmint rifle. The Encore in 223 Ackley Improved, now "proudly" wears the new scope. The scope is not dainty or delicate. It has he-man sized target knobs and the objective is huge. I had to install the high Warne rings and there is barely 50 mils clearance between the objective and the barrel. The cross hairs are as fine as a RCH and the 1/8-inch MOA dot seems to hang in space. I really like that. It doesn't cover up a bunch of ground squirrel. Well, I have put it on the benchrest and even at 32X, the target at 100 yards is bright, crisp, and very clear. I get a very sharp focus! Dick was up at the range and he put up a newspaper target for pistol at about 30 yards, and I was reading the fine print through the scope better than I could from 2 ft with my reading glasses. OK, the optics are better... YES! Better than my Leupold 6.5-20x40 VariX III, both at 20x. Don't fall off your chair getting out the flame throwers. The scope is really good. This is the scope I have been looking for. I did some testing at 100 yards and the click size is 0.1394 inch. I wrote a BASIC program to calculate the clicks out to 900 yards. I am shooting the 40 gr Nosler BT's at 3840 fps. I put the BASIC program on my Shooting Page. It is called click.exe. It is very simple, but works. Look for "Clicks Made Easy".
I have raised and lowered the elevation with the target knobs and put in right and left windage a number of times in the field. The point of impact returns to the original zero.
A few weeks ago, I went squirrel shooting in about a 15 mph cross wind. There were ground squirrels setting on the top of fence posts at 225 and 250 yards. Just looked at my handy chart and dialed in the clicks. Guessed the wind and with the muzzle brake watched two ground squirrels do a 1-1/2 gainers off the top. I missed the third one because I didn't add enough windage. I hit 8 out of 9 shots. Not too bad considering the wind. Also, I don't need a spotter to tell me what went on downrange with the muzzle brake.
There is a downside. At 8X, the edge of the field of view is fuzzy and the scope has the "bubble effect" when you scan with it, where the view appears to be convex. The field of view is large at 8X and I don't use that power unless I am calling coyotes. This does not seem to occur at 20X to 32X.
SCOPE REPEATABILITY.... After taking the Encore 223 Ackley Improved up north
300+ miles (one way) and firing ~65 rounds with numerous elevation adjustments
out to 300+ yards. Most shots were between 150-250 yards. I cleaned the barrel
with Sweet's 7.62 until there is no more sign of copper. Then I follow up with
Shooter's Choice MC#7/Kroil (half & half mixture) and then drove another 50
miles to my mountain cabin and fired this group. I set the vertical Target Knob
back to Zero and fired one fouling round (which would have been in the group)
and then this group. I think you will agree that the Tasco 8-32X by 50mm WCP
scope returns to zero. I did not make any windage adjustments in the field
because the wind was variable. I merely used "Kentucky Windage". There
was a very slight wind from the left for this group. The rifle was getting a 83%
confirmed hit rate in the field.
MY COYOTE/DEER RIFLE.... My coyote and deer rifle is an old Sako Forester
action with a new Shilen stainless steel barrel chambered for a "tight
neck" 243 Win. I got it from Herters'
as a barreled action for $75 mail order in 1958. The stock was a semi-finished
club of French walnut with a fair amount of fiddle back grain for $15. It was my
first stock job and I wore out the stock screws taking it apart and putting it
back together while inletting it. Then, I did a stupid thing. I checkered it! It
took a month and a whole new vocabulary of working words! While I was doing it
and had it all messed up, I swore an oath to myself that I would never checker
another stock and I have kept the promise. Finally I glass bedded it. The barrel
is free floating with a generous gap from about 2 inches forward of the action.
I gave up trying to make a "tight" clearance. It seemed like I
couldn't slide a dollar bill down the barrel after a few months, so I made the
clearance at least 0.05 inches.
![]() CAMO MAKES IT
PRETTY.... About 1980, I painted the whole thing camo. It looks very dull
and there is no shine off the barrel. In about a year or so, the paint wears
down and gets shiny in some areas and then I repaint it. The rifle has about 5
or 6 camo coats on it now and the nice pretty fiddle back wood is down in there
somewhere.
CAMO MAKES IT
PRETTY.... About 1980, I painted the whole thing camo. It looks very dull
and there is no shine off the barrel. In about a year or so, the paint wears
down and gets shiny in some areas and then I repaint it. The rifle has about 5
or 6 camo coats on it now and the nice pretty fiddle back wood is down in there
somewhere.
TASCO TR SCOPE.... The scope is a Tasco TR 4X-16X with a Trajectory/Rangefinder reticule. RedHead (BassPro) used to sell it for $160. The glass is only OK, but the range finder is what makes it my choice! It is a very simple system and works very well. Tasco gives you 5 rings that go on the vertical adjustment knob. Each ring has yardage readings out to 500 or 300 yards in 50 yard increments. They tell you which ring to use for each rifle, but I went one better than that. I wrote a small BASIC program that takes the bullet and velocity that I use and calculates a least square fifth-order polynomial curve fit to the drop numbers in the Sierra Reloading Manual. I then have a third order polynomial equation for the drop out to 1000 yards. No, I don't shoot that far, but numbers are cheap! Setting zero at 100 yards and using the height of the scope over the bore, the program calculates the number of clicks below the line-of-sight for each range past 100 yards. I counted the yardage clicks on each ring and selected the ring that best fits my calculation. I have a ring that is calibrated within ±1 click, of the true drop setting, all the way out to 500 yards for the .243 100 gr. Spitzer at a muzzle velocity of 2900 fps.
ZERO AT 100 YARDS.... I zero the rifle at 100-yards on the benchrest and in the field, I only have two things to estimate for a shot, distance and wind. I also shoot a group off my Bi-Fur-Pod sticks to verify my 100-yard zero for field conditions. Shooting off the sticks gives me the same impact point as I get from the benchrest, but the groups open up a bit because the Bi-Fur-Pod is not as steady.
ESTIMATING THE RANGE.... The scope has dual crosshairs and you can put the coyote between the crosshairs and dial the power until it just fills the height and then read the range on a dial. That is too complicated when you see a coyote and here is what I do in the field. I look in the direction of the coyote and start counting the distance in 100 yard increments. I look for what is 100 yards away from me. Then I look for what is 100 yards from that point, and so on out to the coyote. I am getting pretty good at estimating the range in yards.
DIAL IN THE RANGE.... After estimating the range, I dial the yardage in on the scope vertical adjustment. It is that easy. Windage is more difficult. I have to hold-off for wind. That gets tricky and very difficult across canyons when you can't see the evidence of the wind. I have made some very good shots on coyotes out to 400+ yards in mild wind conditions. I always take all shots off the Bi-Fur-Pod to get a steady hold.
A 50 YARD ERROR.... Suppose I misjudge the range by 50 yards at 400 yards. The error is 5 or 6 clicks and the clicks are 1 inch at 400 yards. So my error is 5 or 6 inches and still within the vital area on a coyote. This is better than using the point-blank method. With the point-blank method, one has to make four estimates, the distance, the amount of hold over in inches required, what the hold over looks like on the target, and windage. It is difficult holding over one foot by guessing how big one foot is at that distance.
POINT-BLANK METHOD NOT FOR ME.... I like my system much better than the "point-blank" method of sighting in where you are 3 inch high at 100 yards and then right on at 220 yards and 4 inch low at approximately 300 yards. You don't know where to guess at 400 yards. Maybe hold over a foot or so, but most of all, you know you are going to be off at every range except 220 yards. Knowing that you are always off does bad things to my confidence and confidence is a big part of shooting accurately.
FINDING THE TARGET IN THE SCOPE.... If you have not used scope sights
or have trouble finding the target, here is a tip.
Wrong Way: Put the rifle up to your shoulder and look in the scope and
scan around to find the target.
Right Way: Look at the target and continue looking at it while you mount
the rifle and put the scope in the line of view. The scope should be nearly
centered on the target when it gets in front of your eye. With just a little
practice you will be able to acquire the target in a fraction of a second. This
also works for binoculars.
MAXIMUM SPIN VELOCITY.... This is in response to some of the BBS posts about "How Fast?" can one shoot a bullet before it will explode in midair. It turns out that it is not how much velocity, but rather, how fast is it spinning that counts. A bullet with a thicker jacket will withstand higher spin velocities than the bullet I selected to model, but here are the results of the analysis.
I have done a 2D Finite Element calculation of the spin velocity necessary to fail a .224 inch 40 gr. bullet with a 0.012 inch gilding metal jacket wall and a pure lead core. The yield stress used for the gilding metal (G21000 95Cu/5Zn) was 15 KSI. At a spin velocity of 307,500 rpm a condition of plastic instability occurs. The bullet's jacket begins to yield and the radius increases. This increase of radius puts an even higher stress on the jacket, but the jacket metal is strain hardening. Instability occurs when the radius increases at a greater rate than the jacket is strengthened due to strain hardening. The Finite Element Code could not find an equilibrium position for the next increment of spin velocity and terminated. Therefore, from the calculation, this bullet would fly apart at or near 307,500 rpm. Using this as the maximum spin velocity capability, the following are the twist rates (inches for one turn) and the associated muzzle velocity to fail this bullet:
Twist = 7 Max Vel = 2989 fps
Twist = 8 Max Vel = 3416 fps
Twist = 9 Max Vel = 3843 fps
Twist = 10 Max Vel = 4270 fps
Twist = 11 Max Vel = 4697 fps
Twist = 12 Max Vel = 5124 fps
Twist = 13 Max Vel = 5551 fps
Twist = 14 Max Vel = 5978 fps
Twist = 15 Max Vel = 6405 fps
Twist = 16 Max Vel = 6832 fps
 Mesh outline.
  Deformations.
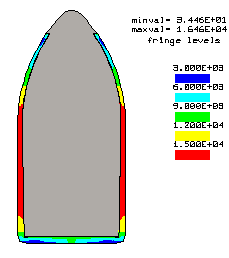 Effective stress.
The first Figure is the outline and detail of the Finite Element mesh. The second Figure is of the deformations, amplified by 20X, at 307,500 rpm. The third Figure is the effective stress levels in the jacket gilding metal at 307,500 rpm and it shows that most of the cylindrical section of the bullet is stressed above the 15 KSI yield stress. The maximum stress is 16.46 KSI. Any damage done to the bullet during firing, such as engraving of the jacket and deformations due to torsional impulse will only reduce the bullet's spin velocity capability.
NOSLER BULLET.... This is a 2D Finite Element analysis, using the NIKE2D code, of a spinning .243 inch 55 gr. Nosler Ballistic Tip bullet. One would think that a bullet with a larger diameter would have less spin velocity capability than a smaller bullet. But this bullet design with the same material properties as the .224 bullet above, fails at 420,000 rpm. The good people at Nosler have cleverly strengthened the bullet to withstand high spin velocities. The first improvement is that the solid base has enough thickness so it does not dish in from the high powder pressures or after exit when the jacket wants to expand radially. Note that the base of the .224 bullet is concave. The solid base also minimizes the radial expansion of the jacket near the base. The second feature is the thick boss at the jacket mouth which provides hoop strength to reduce radial expansion. I did not include the plastic nose tip in the calculation. It is such a light material and the diameter is so small that it would put only a very small radial loading on the jacket nose. But the presence of the plastic nose tip, during flight, prevents the in-flight stagnation gas pressure from radially forcing open the nose of the jacket. All of these features combined make a very stable bullet for surviving high spin velocities. Using 420,000 rpm as the maximum spin velocity capability, the following are the twist rates (inches for one turn) and the associated muzzle velocity to fail this bullet:
Twist = 7 Max Vel = 4083 fps
Twist = 8 Max Vel = 4667 fps
Twist = 9 Max Vel = 5250 fps
Twist = 10 Max Vel = 5833 fps
Twist = 11 Max Vel = 6417 fps
Twist = 12 Max Vel = 7000 fps
Twist = 13 Max Vel = 7583 fps
Twist = 14 Max Vel = 8167 fps
Twist = 15 Max Vel = 8750 fps
Twist = 16 Max Vel = 9333 fps
 Mesh Unloaded
  Deformed
times 5X
Deformed
times 5X 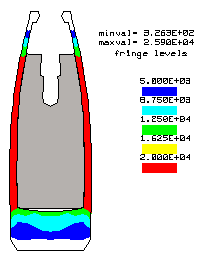 Stress levels at 420,000
rpm
Stress levels at 420,000
rpm
The first Figure is the FEA mesh detail in the unloaded condition. The second Figure is the deformations that occur at 420,000 rpm just before failure with the deformations amplified by 5X. Note that the solid base does not undergo the concave deformations of the thin based bullet above and remains flat. The soft lead core is radially forced outward against the jacket and the nose opening diameter of the jacket remains almost unchanged. The third Figure shows the stress levels in the jacket and a stress of 25.9 KSI is reached before the bullet fails. This, in my opinion, is a very well thought out bullet design.
![]()
![]() RECOIL STAGE ONE.... To
quantify recoil, there are 4 separate items that must be considered as part of a
system; the rifle, bullet, powder, and the shooter's shoulder mass. Just before
the firing pin strikes the primer, the CG (Center of Gravity) of this
"system" is somewhere around the middle of the action. The principal
of conservation of momentum requires that unless an outside force acts upon a
system, the system's CG must remain at the same location. The firing pin hits
the primer, the powder burns and the bullet travels to the end of the barrel.
The base of the bullet is just ready to exit the barrel. Stop time and look at
the condition of the system. The CG of the powder mass has moved forward and is
near mid barrel, the CG of the bullet is just outside the end of the barrel.
Since the CG of the total system must remain in its original location, the rifle
and shooters shoulder must move aft to preserve this original CG position. Also,
since the hot gas and the bullet have a forward velocity, the conservation of
momentum requires that the rifle and the shooters shoulder have a proportional
velocity aft.
RECOIL STAGE ONE.... To
quantify recoil, there are 4 separate items that must be considered as part of a
system; the rifle, bullet, powder, and the shooter's shoulder mass. Just before
the firing pin strikes the primer, the CG (Center of Gravity) of this
"system" is somewhere around the middle of the action. The principal
of conservation of momentum requires that unless an outside force acts upon a
system, the system's CG must remain at the same location. The firing pin hits
the primer, the powder burns and the bullet travels to the end of the barrel.
The base of the bullet is just ready to exit the barrel. Stop time and look at
the condition of the system. The CG of the powder mass has moved forward and is
near mid barrel, the CG of the bullet is just outside the end of the barrel.
Since the CG of the total system must remain in its original location, the rifle
and shooters shoulder must move aft to preserve this original CG position. Also,
since the hot gas and the bullet have a forward velocity, the conservation of
momentum requires that the rifle and the shooters shoulder have a proportional
velocity aft.
The speed at which this process occurs is the difference between a gentle push and a sharp jolt. A high velocity, heavy bullet, and heavy powder charge reacting in a very short interval of time all contribute to increase the severity of the recoil at this point. But this is only part of the rifle's recoil, since this is still a closed system.
The recoil of stage one can only be reduced by:
1. Decreasing the bullet mass
2. Decreasing the bullet velocity
3. Decreasing the mass of the powder
4. Increasing the mass of the rifle
5. Decoupling the shoulder mass from the system by putting some intermediate
shock absorbing material between the rifle and the shoulder.
6. Using the unique muzzle brake below (that operates before the bullet has
exited the barrel).
RECOIL STAGE TWO.... Now advance time, the rifle has a velocity aft, the bullet leaves at its velocity and the system is no longer a closed system. The bullet can no longer affect recoil and has done all it will do in creating recoil. But the barrel is full of hot high pressure gas. There is a reaction imparted to the rifle system as the compressed gas column forces gas out of the end of the barrel at very high velocities (most of it exiting at a much higher velocity than that of the bullet). It is a miniature rocket engine accelerating the rifle aft. The rifle already with a velocity in the aft direction from stage one gains even more velocity and there is a significant increase in recoil. The energy in the hot compressed powder gas can be harnessed to reduce recoil by using a muzzle brake.
STANDARD MUZZLE BRAKE.... The energy still remaining in this compressed gas column at the start of stage two is what makes a muzzle brake reduce recoil. Since the gas is expanding, only a small amount of the expanding gas exits through the bullet hole of the muzzle brake. Most of the gas hits the port surfaces of the muzzle brake and is deflected to the side (stops the forward velocity, good) or is deflected aft (accelerated in the aft direction, best) and forces the barrel forward. This forward directed force reduces the rearward velocity the rifle had just before the bullet left the end of the barrel, in stage one. With a muzzle brake, a larger powder charge is more effective in reducing recoil because there is more mass available to force the rifle forward.
INTERESTING MUZZLE BRAKE.... Here is an interesting concept in a muzzle brake that reduces the sound as well as the recoil. This design would do a very good job, because, it uses almost all of the powder gas to reduce recoil before the bullet even leaves the end of the barrel in stage one. But it is complicated to build and a bitch to clean. Click here to view the design. The WayBack Machine has saved the site. The design was essentially a thin tube that enclosed the barrel. The gas ports about 2 inch from the end of the barrel and inside the tube, allowed gas to be captured in the annulus and then to slowly escape back through the ports out the end of the barrel bore after the bullet had left.
NEW JAVA SCRIPT RECOIL CALCULATOR.... Joseph Gama converted the Recoil Calculator to Java Script and it seems to work very well. I left the same default values on the input side. All the you need to do is change the input values and click on the Calculate button to view the results. If your rifle does not have a muzzle brake, leave the Muzzle Brake Efficiency value set to zero. The calculation uses an exit velocity of 4700 fps for the hot powder gases.
| Rifle
Weight......lb Barrel Twist......in/rev Bullet Diameter...in Bullet Velocity...fps Bullet Weight.....gr Powder Weight.....gr Muzzle Brake Eff..% |
NEW RECOIL CALCULATOR.... Paul Bussieres has ported the old DOS Recoil
program over to Visual Basic 6.0. He has done an excellent job keeping it small
plus all the instructions are right on the screen. I have checked it out and it
works well and is much easier to use than the old DOS version. Click on RecoilVB.zip
(5K)![]() and download the
file to a temp folder on your compute. No installation is required. When you
unzip it, save the RecoilVB.exe program to a folder on your hard drive. Open
that folder and double click on RecoilVB.exe and you will see the Recoil
Calculator view below. Fill in the blanks and click on Calculate. If you no
longer want the program, merely delete the RecoilVB.exe file. There are no other
files added to your computer.
and download the
file to a temp folder on your compute. No installation is required. When you
unzip it, save the RecoilVB.exe program to a folder on your hard drive. Open
that folder and double click on RecoilVB.exe and you will see the Recoil
Calculator view below. Fill in the blanks and click on Calculate. If you no
longer want the program, merely delete the RecoilVB.exe file. There are no other
files added to your computer.

Here is a screen view of a recoil calculation with the RecoilVB program for a
typical bullet. The zero means there is no muzzle brake.
OLD DOS RECOIL PROGRAM.... I have written a small BASIC program that will calculate your rifle's recoil in ft-lbs. for a given bullet weight, velocity, and powder charge. While I was at it, I included the bullet's linear and rotational energy plus the spin velocity. It will print the results on the screen, and also write the results to a ROUT.TXT file that you can rename when you are done. I have compiled the BASIC program into an executable file that will run in a DOS box. Download RECOIL.EXE (37K) and save it in a folder of your choice. I made a C:\RECOIL folder to save it in. Then open a DOS box and go to the directory where you saved it and type RECOIL. The program asks for the input and calculates the recoil, etc. Here is a sample output from a ROUT.TXT file. If you have trouble with the file, I can send the executable it to you by attaching it to an email reply. If anyone wants to play with the program, I can also send you the BASIC source the same way.
Rifle Twist  Bullet Bullet Velocity  Spin Powder Recoil  Bullet  Energy
  Wt           Dia   Mass                  Mass  Energy  Linear   Spin
 (lb) (T/in)  (in )  (Gr)   (fps)    (rpm) (Gr)  (ft-lb) (ft-lb) (ft-lb)    Rifle Info
 11.5   14   0.224    40     4040   207771  38.7   3.26   1450     1.83 Encore 22-250 Imp/40
 11.5   14   0.224    40     4040   207771   3.9   0.89   1450     1.83 Encore with 90% eff. MB
  8.0   14   0.224    33     3050   156857  11.5   0.95    682     0.86 Contender 22-K Hornet
  9.2   10   0.172    17     2550   183600   9.0   0.25    245     0.36 Contender 17 HMR
  8.0   14   0.224    55     3700   190286  40.0   6.08   1672     2.11 Rem 22-250
  8.0   10   0.243   100     2900   208800  42.0   9.42   1868     5.44 Sako 243
  8.0   10   0.243   100     2900   208800   4.2   3.81   1868     5.44 Sako 243 with 90% eff. MB
  8.5   12   0.338   200     3000   180000  73.0  33.20   3997    15.65 Rem 338 Mag
 35.0   15   0.510   750     2800   134400 233.0  92.55  13057    74.49 50 BMG
 35.0   15   0.510   750     2800   134400  23.3  44.26  13057    74.49 50 BMG with 90% eff. MB
MUZZLE BRAKES AND RECOIL REDUCTION.... You can use the recoil code to calculate the recoil reduction effect of a muzzle brake. The expansion chamber in the muzzle brake and the radial holes allow most of the high pressure gas to leave at right angles to the barrel. Based on the area of the lateral holes compared to the axial exit hole, about 90% of the powder gases do not follow the bullet. When calculating, merely use the percent efficiency of the muzzle brake. If there is no muzzle brake, input a zero (0) for the muzzle brake ratio/efficiency.
My Encore 22-250 Imp/40° has an integral muzzle brake. Assuming it is 90% efficient in deflecting the gas to the side, the recoil is only a feeble 0.89 ft-lb! That is less recoil than my Contender 22-K-Hornet bull-barrel shooting the 33 gr. V-Max bullets without a muzzle brake. Looking at the results above, I could reduce the recoil of my Sako 243 Win more than half by including a muzzle brake, but it would ruin my ears, since I dont wear ear protection while hunting. I only forgot to wear ear protection ONCE with the Encore! That one time was the loudest report I have heard from any rifle! Notice that the 50 BMG with a muzzle brake has a recoil that is not much worse than the 338 Rem Mag. One thing I have noticed about some muzzle brakes is that a pressure wave hits you in the face. The first few times the pressure wave caused me to blink and I couldnt spot my hits. This defeated the whole idea of the muzzle brake, but with a bit of control and getting used to the pressure wave, I have suppressed the reflex to blink and now can easily spot my shots with the Encore 22-250 Imp/40°. I have also made a muzzle brake out of aluminum with my Mini Lathe that clamps on my Contender 17 Mach IV barrel. It has made the recoil from the 17 Mach IV like a 22 LR! If you can wear ear protection, a muzzle brake sure improves the varmint hunting experience.
MUZZLE BRAKE CONSIDERATIONS
The Good
The Bad
Other Considerations
|
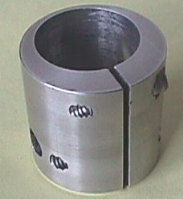
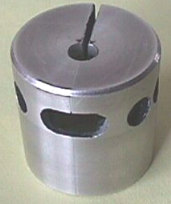
HOME MADE MUZZLE BRAKE.... Here is a simple muzzle brake I made for my 17 Mach IV T/C Carbine 22 inch full bull barrel. It was made out of 7075-T651 aluminum 1-1/8-inch diameter bar stock 1.205 inch long. I made it on my Mini Lathe. It has four 0.25 inch diameter vent holes to the sides and one pointed up. The vertical hole is 1/2-inch wide slot. I used a hacksaw to cut a slot right through the exit hole on the bottom side to make it a flexible clamp. The 0.810 inch diameter by 0.760 inch deep barrel hole was placed 0.050 inch from the top edge to add flexibility for clamping and to provide room on the bottom for clamping screws. At first I only had the front screw but it did not work and I could shoot the muzzle brake about 50 yards with each shot. That doesn't work well for hunting, because I was watching for where the muzzle brake went and missing what is going on with the down range. I added the second smaller clamping screw toward the back where there is more flexibility and it stays securely clamped to the barrel now. The exit hole is 0.198 inch for the 0.172 inch diameter bullets. The expansion chamber where the vent hole intersect is 0.700 inch diameter by 0.325 inch deep. The muzzle brake did not change the point of impact of the bullets. It reduces the recoil to less than a 22 LR and I noticed no problem with vertically escaping gas clouding the view. A good feature is that I can remove the muzzle brake to clean the barrel. Trying to clean a barrel with the brake on is a horrible mess. You have to get out tweezers to pick the trash out of the holes. An integral muzzle brake also makes it difficult to make and inspect the muzzle crown.
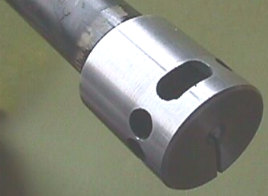 Here is a view from the top showing the vertical slot and the exit hole |
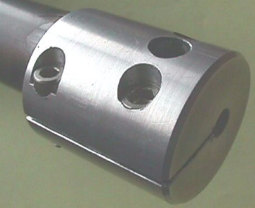 Side view showing the two clamping screws. The front screw was not enough by its self. |
 Rear view showing the barrel hole close to the top edge. |
 End view showing the slot into the exit hole. |
TWIST AND STABILITY.... The Greenhill formula is (Twist=180*Dia²/Length). It is used to calculate the required twist rate to stabilize a bullet of a given diameter and length. It appears to be a reasonable approximation for estimating stability of bullets fired at moderate velocities. Bullets fired at higher velocities are probably stable with somewhat slower twist rates than predicted by the formula. Pick out your bullet's diameter line on the curve below. If your bullet's length and barrel's twist fall on, or to the left of, the diameter line, it should be stable. Notice that the weight of the bullet is not important and not in the equation. Typically heavier bullets are longer, but with the new Ballistic Tip style bullets, they can be quite long but weigh less than a shorter bullet of another design. Here is what Shilen says about twist. Shilen's web page. First, go to Products, then Calibers and Twists. But Shilen talks about bullet weight when it should be length. Maybe it is easier that way, because most people never measure the length of a bullet anyhow. Notice that the VLD bullets are very long and in a round-about way, the longer length is implied on their recommendations. See Twist Rate at Wikipedia.
Note: The constant of 180 in the equations if for Muzzle Velocities greater than 1800 fps. For slower muzzle velocities, the constant of 150 is used.
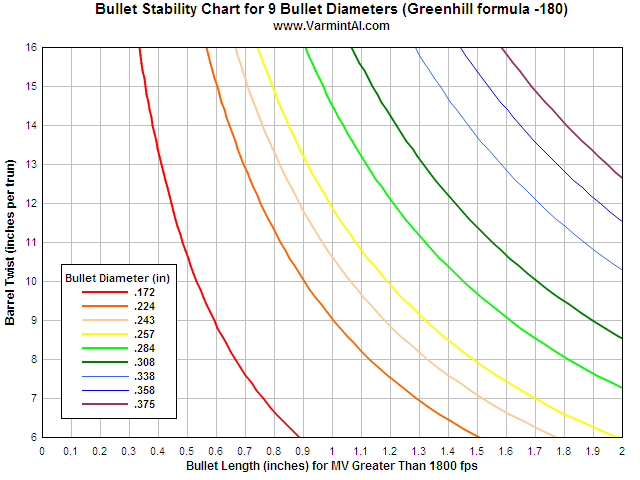
This chart for Muzzle Velocities GREATER THAN 1800 fps.
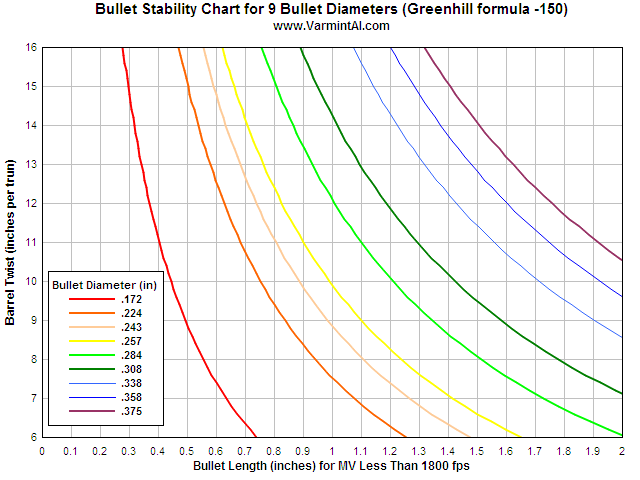
This chart for Muzzle Velocities LESS THAN 1800 fps.
![]()
BENCH TECHNIQUES FOR YOUR BEST GROUPS
By Jeff (AKA One Hole)
Last updated 1/5/99
I see many people out at the range, swearing at their rifle and wondering why it doesn't shoot as well as mine. When I watch them shoot I'm sometimes amazed that they can keep their shots on the paper! Shooters that are only interested in whether or not their rifle/ammo combo will hit a deer, might not care about small groups. However, varmint shooters who are trying to hit small targets at long ranges should care what their rifle, ammo, and especially they as a shooter are capable of.
I'm an avid home gunsmithing/reloading/varmint hunting hobbyist. I will tune and fiddle with a rifle until it reaches the maximum accuracy I think it can give. To do this, I have to be sure that the groups I'm getting are a result of the gun or the load, and not negatively influenced by my shooting abilities. I've spent quite a bit of time researching benchrest shooting techniques, and am now competing in Benchrest matches. A Benchrest competition is perhaps the best place to learn, and refine your skills, and also see how you stack up against some other good shooters.
Now, while I'm by no means an expert, I do have a number of rifles that I can consistently shoot 5 shot groups under 0.5 MOA at 100 yards, or under half an inch. Heard about covering your groups with a quarter? Well, I don't even start to relax until I can cover them with a dime. Some of my rifles I expect to cover 5 shots groups with something closer to an thumb tack (so I can call them a tackdriver). I shot one group in a registered competition that you could easily cover all 5 shots with an aspirin, and it wasn't even the best group of my relay!
A few years back, I used to read about the size of benchrest groups and wonder "HOW DO THEY DO THAT?". We're talking about 5 shots groups where the average of 5, of these 5 shot groups is usually under 0.25 inch. Contrary to what you may hear or read, that level of HONEST accuracy is harder to achieve than you might think. We're not talking about the occasional lucky group. We're talking about day in/day out performance! You are not going to get anywhere near that level, unless you learn and use a consistent bench shooting method to test and evaluate your guns and loads.
So, here are some of the things I've learned. This might not be complete enough to allow you to win a benchrest match, but it will sure help you shoot the best groups that you can with your varmint rifles. It's by no means a complete list but it's a start. You can take whichever ideas you choose to heart depending on your interest and, unfortunately, sometimes your budget. I use these tips seriously at the range, but in the varmint fields you can't practice this all the time. That's OK! That's the small concession I give to the ground squirrels! It's their edge! For the same reason, I won't take a shot under 200 yards with one of my serious varmint rifles (unless they're being chicken and only showing their head). I save those for the rimfires and Hornet. Besides, it would be too embarrassing if I missed!
I did not invent ANY of the following methods. They are covered in many good books, and I have spent some time talking with competitive shooters. So credit should go to them. I'm only trying to summarize the key points for those who might not want to buy the book!
BENCH AND BAG SETUP.... The goal is to get setup so that your rifle will practically stay aimed at the bull, without any guidance from your hands. This also will allow a consistent recoil path for the stock to move EXACTLY the same every shot. Sling swivel studs are a big problem here. They will catch on the bags during recoil and cause inconsistent stock movement. Unfortunately, they place these swivel studs right where your rifle needs to be resting on the bags. If you want to do some serious load and accuracy testing take off the studs. The other option is an attachment that Hart makes. This has a flat bottom and attaches to your swivel studs. The flat bottom "rides" the bags very well.
IF available, use a concrete bench. These are much more sturdy than a wooden one. At my range, when I'm on a wooden bench and sighted on the bull, if someone fires a shot a few benches down, it will move my crosshairs off the bull.
Get the sturdiest, heaviest front rest you can afford. Hart's is one of the best. Bald Eagle also makes a good one. Hopefully the front rest will have the forearm stop post in front that prevents your stock from moving forward. This assures that your rifle is in the same place on the rest for each shot. This is very important. Don't believe it? Shoot a few groups with the stock resting on the bag near the tip of the stock, then shoot a few groups with it a few inches back. I bet your POI (Point of Impact) will change. If you don't have the stop, place some tape on your stock that you can use as an index point to the front rest.
The rear bag, should have bunny ears, to rest the buttstock in. Even the sand you put in the bags makes a difference. There is a sand called Heavy Sand, or Zircon. When I heard about this, I thought it's one of those gadgets that doesn't buy you anything. Wrong! It definitely helps. Bags filled with heavy sand, which is a very, very fine grain sand, are extremely stable.
Place the front rest on the bench so that the rifle barrel will hang over the edge of the bench. Align the rear leg of the rest so that it is pointed directly at your target. Then place your rear bag so the V between the bunny ears is in a direct line with the target and the rear leg of the front rest. Position your rear bag about an inch from the end of the stock, or you will get fliers. You don't want the rifle to be binding in the bags, or to have to twist, or torque it to one side to get it pointed at the bull. Remember it should point, and stay on the bull while you're not even touching it.
Now set your rifle in the bags and adjust the front rest height so that it is pointed at the bull while the rear stock is on the rear bag. Test your setup by sliding your rifle rearward, like it would in recoil and then slide it forward to the stop it should still be pointed at the bull. You can't do this unless you have good bags and rests and good sand in both the front and rear. Benchrest shooters use baby powder, or Suave Antiperspirant spray on their bags to make them slippery to help the stock slide smoothly. If your stock is textured, or checkered, this might be a problem. There is a special Teflon tape made to stick on your stock, which smoothes out texture in the stock and helps it slide consistently.
One quick note. Many shooters feel you can make slight elevation adjustments by squeezing the rear bag. OK, sometimes you might have to do this, BUT they should be VERY slight adjustments! Ideally, you'd like to not have to do this. It would be better if your rifle was pointed at the bull and your only contact with it, or the rear bag, was at the trigger. That is where fancy front rest with elevation and windage adjustments really are useful.
SCOPE SETUP.... Most Varmint scopes have an adjustable objective. If you read the manufacturer's brochures, they tell you that parallax error will only amount to a small fraction of an inch at 100 yards. Well, first of all, it's small fractions of an inch we are worried about here. Secondly, what they don't always point out is that parallax error is a function of scope magnification. It might be a small fraction of an inch at 4 power or even 9 power but when you get to 24 power or 32 power, it becomes a much larger fraction of an inch. Most folks just set their front ring to the 100 yard mark. But these are not always (hardly ever) calibrated correctly and they will change due to temperature. On some scopes, you might have to have the ring set closer to the 200 yard mark before it is parallax free. So take some time to adjust out your parallax. Once you've got your rifle sitting on your bags, and aimed at the bull, move your eye back and forth sideways being careful not to move the stock with your face and watch and see if the crosshairs move on the target. If they do, you have a parallax error. Adjust the front ring until moving your head sideways doesn't move the crosshairs on the target. Then check it by moving your head up and down. Some scopes you will be able to adjust out the parallax for lateral movement but not vertical. You can't have it all! So pick one or try to get the least amount of movement between the two. If you don't adjust out the parallax, you will get POI changes by not lining up your eye with the scope exactly the same way each shot.
A quick note here. This tip was given to me by Randy Robinett, who was the Hunter Class 100 Yard National Champion last year and has made quite a study of the internal workings of a scope. The mechanical design of the adjustable objective has some, what we will call screw lag. In other words, if you are going back and forth on the ring while you are adjusting this you might leave the lens assembly in an unsupported position, in a state of limbo, where it's not supported on either side and it can wiggle slightly. Basically, the lens and consequently your aiming point will move under recoil and not be consistent. For this reason, it's best to always set your front ring by coming in from one direction. After finding that point where you have no parallax, mark it somehow (you can use tape with the correct yardage printed on it). Then turn your front ring one quarter turn one way and come back and stop right on your mark. Now we're getting nit-picky but hey, how you gonna shoot a quarter inch group?
TRIGGER CONTROL.... Ever wonder why benchrest shooters use triggers that have 2 ounce pulls, or less? Well, look at it this way. Let's assume the front of the rifle was fixed couldn't move. If while you were pulling the trigger, you just moved the rear of the rifle just 1/100th of an inch, you've just changed your POI about and 1.5 inches. JUST 1/00th OF AN INCH and you've just blown your group! So, it stands to reason, the more force you must exert on your trigger to release the sear, the more the rifle will move. I like to think of it this way. A two pound trigger requires half the force of a 4 pound trigger (32 oz Vs 64 oz). So, a 2 oz trigger requires 1/16th the force of a two pound trigger (2 oz vs. 32 oz)!
I can't tell you how many rifles have had amazing improvements in groups, just by changing to a competition trigger, or at least having it adjusted as low as you can get it. This is the first thing you should do to a rifle that you're expecting great things from. WARNING! Triggers are very touchy and sensitive mechanisms. If you are not sure what you are doing, have a gunsmith adjust your trigger and test it.
Now, test what your trigger pull is doing. You don't need ammo for this. I like to start with the gun cocked and the safety on just so you can see how much your crosshairs move when you pull on the trigger. Get set up like you're ready to shoot and aimed at the bull. Now squeeze the trigger, while keeping a very close eye on the bull and the crosshairs. Did the crosshairs move? Then expect it to move when you shoot for real. Now play around with different positions for your trigger hand and thumb. I'll bet you if you place your thumb on the side of the stock that you will get lateral movement when you pull the trigger. A better place to put your thumb is on top of the tang or not place it at all. Some benchrest shooters will place their thumb on the back of the trigger guard, and just squeeze thumb and trigger finger together to fire. Whatever method you use, you should be able to exert enough force on your trigger be it 2 ounces or 2 pounds without causing the crosshairs to move on the bull. Practice this.
RECOIL CONTROL.... With light kicking rifles, like most varmint rifles, you might get better results using the free recoil method. This means your shoulder is not pressing into the stock, but maybe just behind it by a fraction of an inch. Remember we're trying to get the rifle to act in exactly the same way for every shot. If you're pressing your shoulder into the butt, how can you control the amount of force you exert on it exactly the same way each shot? By letting the rifle free recoil for that fraction of an inch, you are giving the bullet time to get out of the barrel, before you screw it up! Try this method and see if it improves your groups. Heavier kicking, larger caliber rifles need to be held with some pressure against the shoulder.
GOTTA GET DIRTY FIRST!.... When you're ready to start shooting, don't just take your cold & clean barrel (CC) and start right off with your first shot of a group. Barrels need to be fouled and warmed up before they will settle down. If you only make 5 of a particular load, like I used to do, my groups were often the 4 and 1 type group. With the first shot being the flyer, and the others all in a cluster somewhere else.
There are two separate mechanisms at work here. The first is the warm up. Cold steel will have different harmonics than warm steel. There has been tests done that say it takes at least 30 minutes after a shot for a rifle to get back that "cold" status. So you usually don't have to worry about this after having to wait 10 minutes between cease fires at your range. I often use targets that I print myself and copy because I shoot a lot of them. These targets usually have 4 bulls on a standard 8 x 11 page. I always use the first bull to shoot that CC shot and a few warm ups. This way I know how each rifle shoots when it's CC. It's not uncommon for that first shot to be an inch out of the group.
The other factor is fouling. Both copper and powder. Most shooters are aware that a few fouling shots are required, but they usually only worry about copper fouling. What fouling is doing is filling in all the microscopic nooks and crannies in your bore with copper from your jackets. A certain amount of fouling is good, we want that. Of course, too much fouling will start to hurt accuracy. However, powder plays a part in the fouling also. And different powders will leave different amounts and types of residue in your bore. Here is why this is good to know. Like I said, I used to load up 5 rounds each, of many different loads. I thought this would be enough to give me a good statistical look at the chronograph data and also give me an idea of group potential. Sometimes, when I would switch to a load with a new powder the groups would be bad. I figured these were bad loads, but some of these turned out later to be excellent loads. What I didn't know then was that switching powder will also require a few shots to settle down your barrel and get it used to that new powder. I was surprised to learn this but it's true.
OK, SHOOT A GROUP!.... Now, you've just taken your first shot. The rifle has moved back in the bags. Gently slide it forward until it hits the stop or move it up to your tape. The crosshairs should be back on the bull and you're ready to put that next shot through the same hole! But wait!
Most heavy barrels do a good job of heat dissipation. Sporter weight barrels do not. As the barrel gets hotter, POI will change. Even heavy barrels will show some movement. So it's best to give a consistent wait period between each shot. For your best groups, wait one minute between each shot. And while you're waiting don't leave that next round in the chamber. It will get hot and if it's a near maximum load pressure could change just enough to blow out your groups. By the way, if your heavy barrel shows signs of changing POI's as it gets warmer and it's COMPLETELY free floated with plenty of clearance, having that barrel cryogenically stress relieved (frozen) might help correct this.
OK, now shoot the rest of your group. Do everything the SAME way for each shot. Trigger pull, slide it forward to the stop Voila! you have small groups. Or, you at least know it's not you and that your rifle or your load needs some fine tuning.
WIND AND MIRAGE.... Don't we all hate it when you've got that scoped cranked up all the way and all you see is a big blur? Well, mirage can be an aid in reading the conditions. Unfortunately, I'm not good enough yet to tell you how to do this. What I do know, is that mirage will "follow" the wind. If there is no wind the mirage rises straight up they call this a "boil".
What it does is fool you into aiming where the bull is really not! This can cause a half inch or more of error at 100 yards. So, if you shot your first few shots while your barrel was cool and there was no mirage then things get fuzzy and you aim at what you think is the bull, you might get some vertical fliers. Some of the mirage will be exacerbated by the heat from your barrel. However, some of it will come from the conditions. You can try to minimize this by using mirage tubes, which are usually long translucent tubes attached to your scope like a sun shade. Or, you can devise a shield to place over your barrel made from plastic or tin foil. A very light material should not affect your barrel harmonics. The best thing to do is practice in mirage conditions and see what affect they have on POI. In other words don't compensate for it when you see mirage and shoot where you see the bull. If you have a nice tight group going and all of a sudden your bullet hits half an inch high, you'll know that under that particular mirage you need to hold off half an inch low. Mirage will move laterally with the wind, so it can be used to give you an idea of how much the wind will affect your shot.
By the way, mirage DOES NOT go away by turning your scope to a lower power. You just are less aware of how much of it there is. You think it's not there but it is. Look at the equipment list of winning benchrest shooters. They don't have variable power scopes, they are almost universally 36 power fixed scopes! They want to know what the mirage is doing and how much to compensate for it!
And that brings us to wind. A good number of shooters just don't know, or believe what a 5 mph wind will do to a high velocity bullet at100 yards. A 5 mph crosswind, will move a 50 gr. 22 cal bullet traveling 3400 fps over half an inch at 100 yards. Double that for a 10 mph wind. BELIEVE IT! So, if you're not going to be like benchrest shooters and put out fancy windflags every 25 yards, at least be aware of the wind. Most ranges have at least one flag you can look at. When I don't want to set out wind flags I at least place a piece of long masking tape hanging down near my target and usually one on the chronograph bar right in front of my bench. Wind near the muzzle will have a much greater affect on wind deflection than a wind down near the target. Think about it. If a wind near the muzzle pushes your bullet slightly off course it has the whole 100 yards to keep going off course. Unfortunately, they don't straighten themselves out! It will keep going off on a tangent. Here's an idea! Don't try to shoot your best groups when it's real windy! Realistically, at least try to shoot each shot in an identical wind condition by looking at flags or other indicators (tree branches grass, cigarette smoke etc!)
WRITE IT DOWN.... Always keep your targets. Date them, fill in the load data and things like temperature and wind conditions. These can be very helpful when you're trying to remember if you've ever tried a particular load, or how it performed. For your pet loads, this is also a good way to track the performance of the load and your gun over time. When your pet load starts to open up, it could mean it's time to rebarrel, or something else is wrong with your gun.
WHAT IS GOOD?.... How do you know when you've reached the maximum potential of your rifle? This will vary by rifle type and caliber, but here are the guidelines I go by after having tuned and tweaked quite a number of varmint rifles over the years. The following guidelines are for a standard factory rifle. Rifles with premium barrels, custom actions, or trued factory actions should be able to do better depending on the caliber.
By the way, caliber plays a big part on what kind of accuracy you will be able to get. Factors like case design, powder capacity/bore ratio and especially bullet availability make some cartridges inherently more accurate than others. For example, and I got this from Shilen's web site, a 340 WBY has an accuracy potential of .75 MOA. Meaning no matter what you do to the gun, or your load, about the best you could expect would be to average .75 inch groups at 100 yards. On the other hand, the 6PPC has an accuracy potential of .1 MOA. Meaning that if you have a perfect barrel, perfectly mounted on a true action, you could potentially get tenth of an inch groups at 100 yards.
Ok, here's what I strive for. If it's a heavy barrel, bolt action in a good varmint caliber I shoot for 0.5 inch groups, but hope for better. If it's a standard weight sporter barrel, I shoot for 1 inch groups. Remember, this for an average of 5 consecutive 5 shot groups. There are not too many rifles that come out of the box shooting this well, but I've been able to get most of them tuned to this level, just by doing stuff that the average home gun hobbyist can do. This might include adjusting the trigger, rebedding, lapping scope rings, or firelapping the barrel. I used to jump right into load development when I got a new rifle, but they never performed like I wanted them to. So after doing all the above I'd have to do the load development all over again. Those components add up. Now when I get a new rifle, I rebed it, replace or adjust the trigger, and usually firelap the barrel before I ever even put a scope on it and take it to the range.
Finding the right load is the key remaining item. Geez, that topic could take up a whole book, but until you experiment and find that load, you won't get optimum accuracy from your rifle. The two quickest tips I can give you are pick a powder that other people report performing well in your caliber and concentrate on finding the perfect seat depth for a given bullet.
Good luck and may all your groups be ONE HOLE!
![]()
Reading Mirage to
Estimate the Wind
by WindReader
I went to U.S. Army Sniper Instructor course, where we were in fact taught
how to read mirage. I can only repeat what they teach.
Mirage is, of course, heat waves, and they tell you what the wind is doing, and
how fast it's blowing and from which direction. You can judge the wind speed
from how flat the mirage is.
Mirage is much more sensitive to wind than any range flag or any other
indicator, because it has no mass. So it's good to keep your eye on.
In case you don't know the common ways to judge wind speed, I'll go over them.
In the field, you can stand up and drop a handkerchief. Point at where the
handkerchief falls, then estimate the angle your arm is. Divide this by 4, and
you have the wind speed. Same with a flag, if you can see one. The angle between
the bottom of the flag and the flagstaff, divided by 4, is the wind speed. Of
course this only works up to 90 degrees, but if the flag is at 90 degrees,
that's 22+ mph wind, too fast for shooting anyway!
A true boiling mirage means either there is no wind, or the wind is at 6 or 12
O'clock. That's a zero value wind, and you don't have to allow for it. You can
determine exactly which direction the wind is coming from by turning your
spotting scope until the mirage boils. That's the wind direction.
A "full value" wind comes from 3 or 9 o'clock, and is described in the
next paragraph. It will affect bullet strike most.
If the wavy lines are very prominent, the wind value is from 0-7 mph. If the
waves appear but are flatter, the wind is 8-12 mph. If the mirage appears almost
flat, the wind is above 12 mph. And at 15 mph wind, the mirage appears as a
stream.
If the mirage is boiling and slanting to the left, the wind is coming from 1-2
or 4-5 o'clock, and if boiling and slanting to the right, its' from 7-8 or
10-11. This is a half-value wind.
Wind Value: For a .30 caliber military weapon, (173 gr. bullet) you can figure
the "value" of the wind in clicks by the formula Range X Velocity
divided by 15, which gives you the clicks of hold off. Drop the last two zeros
in the range when doing the math. This is for a full value wind. If it's a
half-value, divide the result in half.
With a .223, divide by ten. I looked at my data, which was for a ½ M.O.A.
scope, and I'm pretty sure I adapted it for a ¼ M.O.A. scope, so this may not
be exact. In any case, it's a starting point.
Of course shooting at a hundred yards for a tiny target is much different from
shooting at 900 yards at a man-sized target. These data may not be worth a damn
for that. For longer ranges, though, the mid-distance mirage is what to focus on
with the spotting scope when doping wind.
Mirage also deflects light, so it affects what you see, which affects how you
hold. So it really is a dual-purpose concern.
Here is a diagram as best as I can draw it, showing what mirage may look like. A
boiling mirage with a head wind or a tail wind will look like the No Value
diagram, or may look like it's actually "boiling." It has no value for
windage purposes.
This is an attempt to show how mirage looks and how to evaluate its value
when determining bullet strike. The top picture of a boil is when there is no
wind, the bottom is when the wind is fast, but in each instance, the wind has no
value.
The top pictures show when the wind is quartering: 1 shows from the right, 4
from the left. Picture 3 shows the wind from 6 or 9 O'clock, a full value wind.
The flatter the waves, the faster the wind is blowing You have to estimate the
wind speed to properly estimate how many clicks to put on your scope or how much
to hold off.
Pictures 5 and 7 are full value winds, directly from 6 or 9. Picture 6 is a full
boiling mirage, with stronger winds directly from 6 or 12. . Boiling mirage,
which happens when the wind is directly at 6 O'clock or 12 O'clock, or when the
wind isn't blowing much at all, has zero value.
Thanks WindReader for the info. Good Hunting... from Varmint Al
![]()

|
|
||||
|
|

If you want to link to my page, the URL is:
http://www.varmintal.com/ashot.htm
If you want a Logo for the link on your page, right click on my
Varmint Al's Shooting Page logo above and save the valshot.gif file to your hard
drive.
Let me know you have made the link and I will link to your web page.
Last Updated: 02/02/2015
End of Page![]()